Network Capture
Overview
Network capture for HTTP traffic is available. After the capture has completed a HTTP archive (HAR) file will be available for download by members of your organization via the TV Labs sessions dashboard.
Supported Platforms
Unlisted platforms are not supported at this time. Additional platform support will be rolled out incrementally.
| Platform | Capture Method | Notes |
|---|---|---|
| Roku | Traffic Interception | Certificate install required in app bundle. See special considerations. |
| Android Mobile | Traffic Interception | Manifest configuration required. See special considerations. |
| Android TV | Traffic Interception | Manifest configuration required, and certificate install required in app bundle. See special considerations. |
| Fire TV | Traffic Interception | See Android TV |
| Google TV | Traffic Interception | See Android TV |
| VegaOS | Traffic Interception | Always uses Direct Proxy. No application changes required. See special considerations. |
| tvOS | Traffic Interception | |
| iOS | Traffic Interception | |
| Google Chrome | Traffic Interception | |
| Firefox | Traffic Interception | |
| Safari | Traffic Interception | |
| SmartCast | Chrome DevTools Protocol | |
| WebOS | Chrome DevTools Protocol | |
| Tizen | Chrome DevTools Protocol |
Traffic Interception Proxy Modes
Platforms that use Traffic Interception as the capture method support two proxy modes:
Transparent Proxy (default)
Transparent proxying is the default mode. Device traffic is automatically redirected through the proxy using network routing rules. The TV Labs CA certificate is installed on the device (unless noted otherwise in the special platform considerations section), allowing the proxy to intercept and inspect HTTPS traffic.
Direct Proxy
Direct proxying is available for situations where your application cannot use the TV Labs CA certificate for a specific request (e.g. the Roku Ad Framework, or other SDKs that manage their own TLS certificates). In this mode, no network routing rules are applied and no CA certificate is needed. See Direct Proxy in the usage section for details on how to use it.
On VegaOS this is the only mode: capture always runs the direct proxy, whether or not you ask for it.
Chrome DevTools Protocol Mode
Platforms that use Chrome DevTools Protocol as the capture method support one proxy mode:
Event Based Proxy
When the application is started, the Chrome DevTools Protocol is used to connect to the debugger and subscribe to network traffic events. When this capture mode is started, the page is refreshed with a cleared cache. This ensures that a complete page load is gathered when beginning a new capture. To disable this behavior, for example to capture a button click network event, use the reload and cache options.
Usage
Lua API
Network capture can be started and stopped in the middle of a session by executing Lua functions.
network.startNetworkCapture()network.stopNetworkCapture()
See more details in the Lua API documentation.
Example snippet:
startResult = network.startNetworkCapture({ name = "my-capture-" .. math.floor(os.time(os.date("!*t"))) })

if not startResult["success"] then
  print("Failed to start network capture: " .. startResult["error"])
  do return end
end

-- simulate some work
wait.inMs(10000)

endResult = network.stopNetworkCapture()

if not endResult["success"] then
  print("Failed to stop network capture: " .. endResult["error"])
end
Appium
See the Appium network capture documentation for details on using network capture in an Appium session.
Direct Proxy
Instead of intercepting traffic transparently, direct proxy mode requires your application to prefix all request URLs with http://local.tvlabs.ai:8087/; so that traffic is sent to the proxy over plain HTTP. The proxy strips the prefix, forwards the request to the real HTTPS destination, and returns the response to your application.
For example, to capture a request to https://api.example.com/v1/data, your application would request:
http://local.tvlabs.ai:8087/;https://api.example.com/v1/data
To enable direct proxy mode, set direct_proxy to true when starting network capture. On VegaOS it is always enabled, and URL prefixing is not required — TV Labs configures the proxy inside the application package for you.
Filtering Captured Traffic
Filters let you reduce the size of a HAR file by excluding information that isn't relevant to your test case. This is useful for excluding noise such as image assets, telemetry pings, or large binary payloads. Filters are supplied as a list of filter objects, each with an action, and one or more criteria.
Actions
Each filter must specify one of two actions:
| Action | Effect |
|---|---|
drop | Drops the entire entry (request + response) when the filter matches |
omit | Keeps the HAR entry and its metadata, but strips the body from the matching side |
Criteria
To be valid, each filter must specify at least one matching criterion. All criteria within a single filter are AND'd together — a filter only matches when every specified criterion matches. Multiple filters are OR'd — an entry is affected if any filter matches.
| Field | Type | Description |
|---|---|---|
hostname | regex string | Matches the request hostname. Accepts a regular expression (e.g. ".+\\.cdn\\.com", "www\\.google\\.com") |
path | regex string | Matches the request URL path. Accepts a regular expression (e.g. "/api/v1/search", "/api/.+/search") |
mime_type | regex string | Matches the Content-Type. Accepts a regular expression (e.g. "image/.+", "application/json"). |
max_bytes | integer | Matches when the body size exceeds this value in bytes |
Target
The optional target field controls which side of an entry the filter applies to. Defaults to "all".
| Value | Description |
|---|---|
all | Applies to both request and response (default) |
request | Applies only to the request |
response | Applies only to the response |
The target field is only meaningful for the omit action. drop always removes the entire entry regardless of target.
Example Filters
Drop all image responses — useful for removing static asset noise from the HAR:
{
  "action": "drop",
  "mime_type": "image/.+"
}
Omit response bodies for a specific host — keeps the entry metadata (status, timings, headers) and request body, but removes the response body:
{
  "action": "omit",
  "target": "response",
  "hostname": "analytics\\.example\\.com"
}
Drop large responses — removes any entry whose response body exceeds 500 KB:
{
  "action": "drop",
  "target": "response",
  "max_bytes": 512000
}
Combine criteria — drop responses from a CDN that are also images (both criteria must match):
{
  "action": "drop",
  "hostname": ".+\\.cdn\\.example\\.com",
  "mime_type": "image/.+"
}
Passing Filters via Lua API
Filters can be passed to network.startNetworkCapture() as a list in the filters field:
startResult = network.startNetworkCapture({
  filters = {
    { action = "drop", mime_type = "image/.+" },
    { action = "omit", target = "response", hostname = "analytics\\.example\\.com" }
  }
})
Passing Filters via Appium
See the Appium network capture documentation for details on passing filters via Appium capabilities or execute methods.
Viewing Network Logs
On the Sessions Dashboard
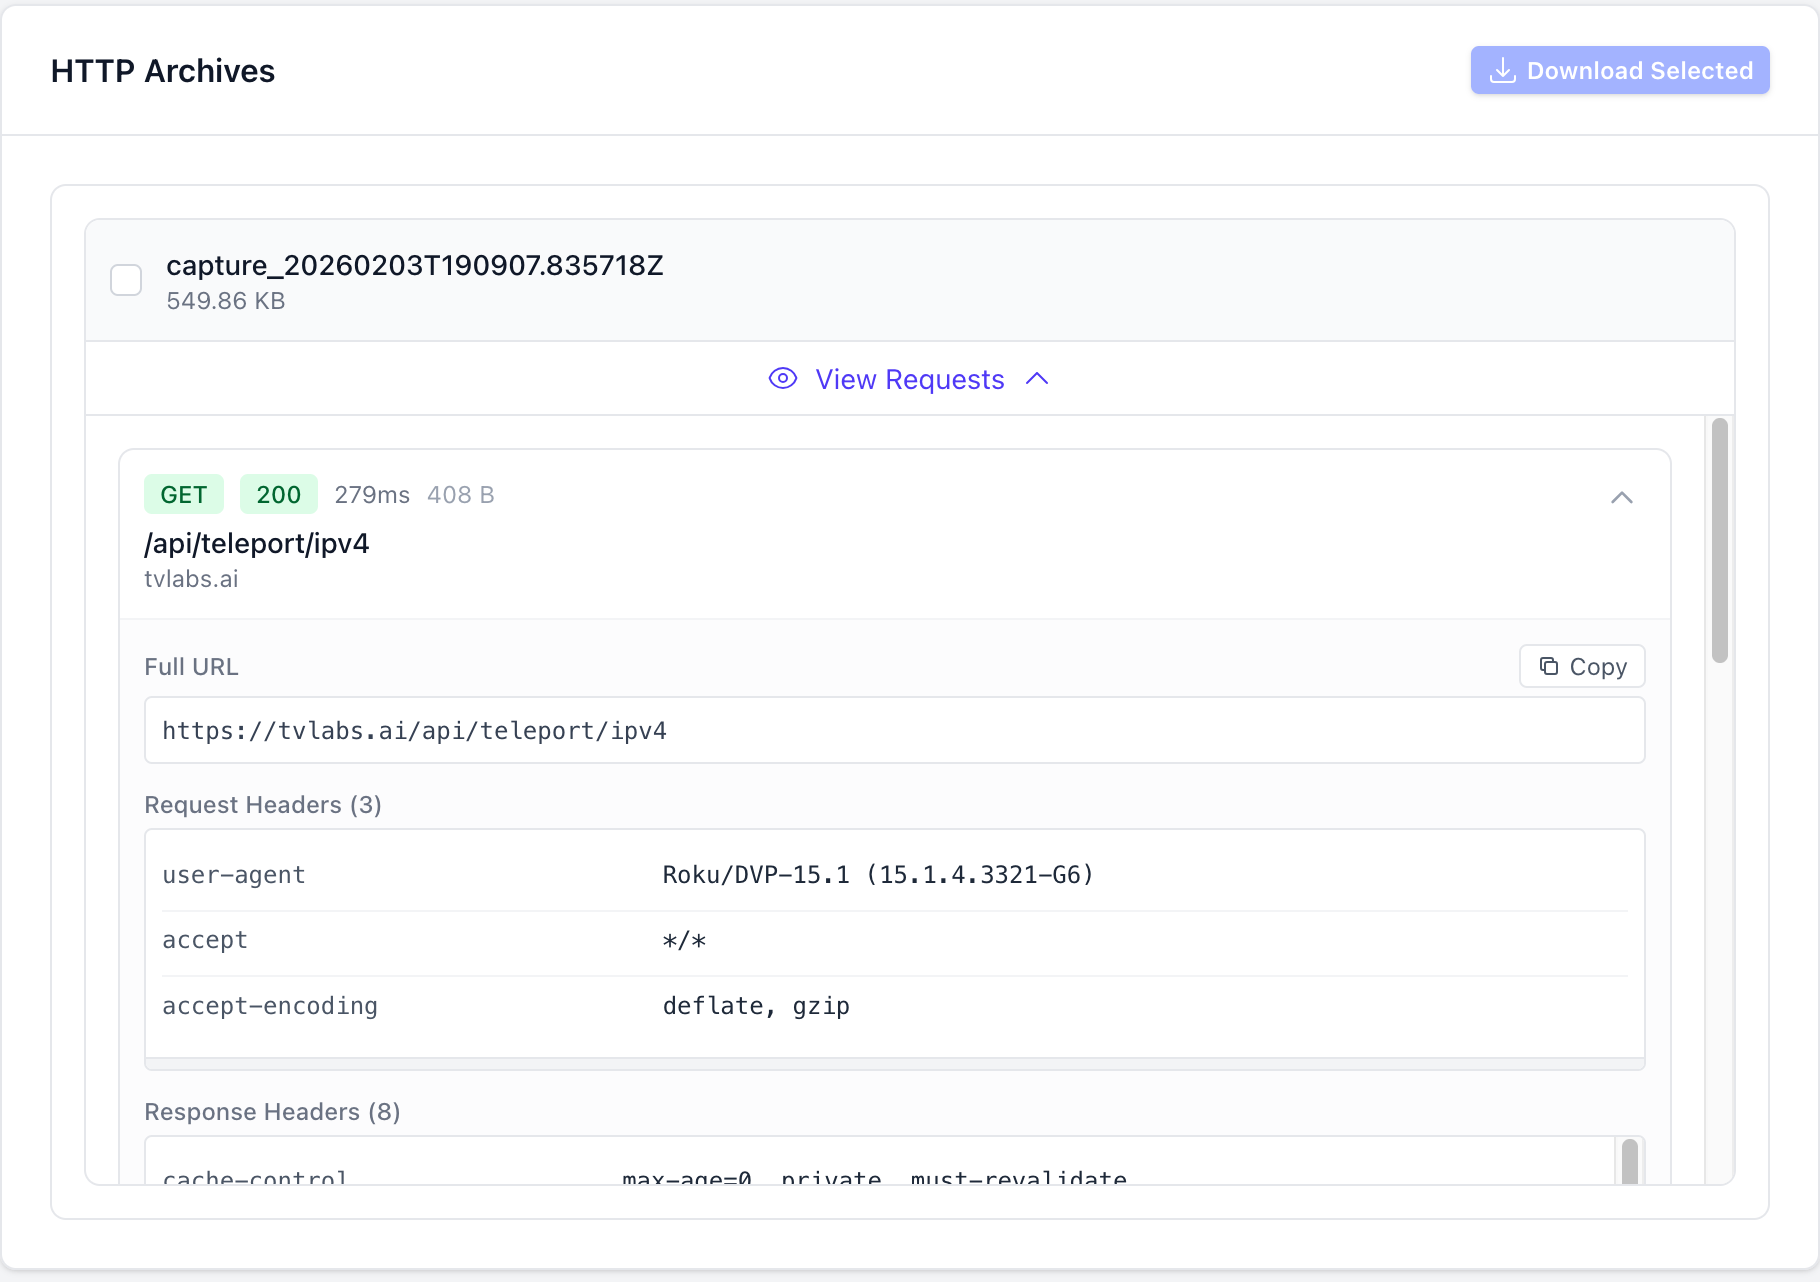
To view the network logs for a session in the TV Labs sessions dashboard, navigate to the session in the TV Labs sessions dashboard. Scroll down and find the "Network" tab, and click "View Requests" on the HTTP archive you wish to view. You may also click the "Download Selected" button to download the selected HTTP archives as a HAR file.
Download HAR API
An API endpoint to download HAR files for a session is available at /api/v1/download/http-archive/<archive_id>. This endpoint requires authentication with a valid API key. On success this endpoint returns a redirect to a download of the HAR file.
Example script to download all HAR files for a given Appium session ID:
#!/usr/bin/env bash

APPIUM_SESSION_ID="$1"
DIRECTORY="$APPIUM_SESSION_ID-har"

mkdir -p "$DIRECTORY"
pushd "$DIRECTORY"

if [ -z "$APPIUM_SESSION_ID" ]; then
  echo "Usage: $0 <appium-session-id>"
  exit 1
fi

if [ -z "$TVLABS_API_KEY" ]; then
  echo "error: TVLABS_API_KEY is required, please configure it in your environment"
  exit 1
fi

# Get all archive IDs from the session and download each HAR file
curl -s -H "Authorization: Bearer $TVLABS_API_KEY" "https://tvlabs.ai/api/v1/sessions/appium/$APPIUM_SESSION_ID" \
  | jq -r '.data.http_archives[].id' \
  | xargs -I {} curl -L -H "Authorization: Bearer $TVLABS_API_KEY" -o "{}.har" "https://tvlabs.ai/api/v1/download/http-archive/{}"

# List the downloaded HAR files
ls -la *
popd
See the API documentation for more details.
Third Party Tools
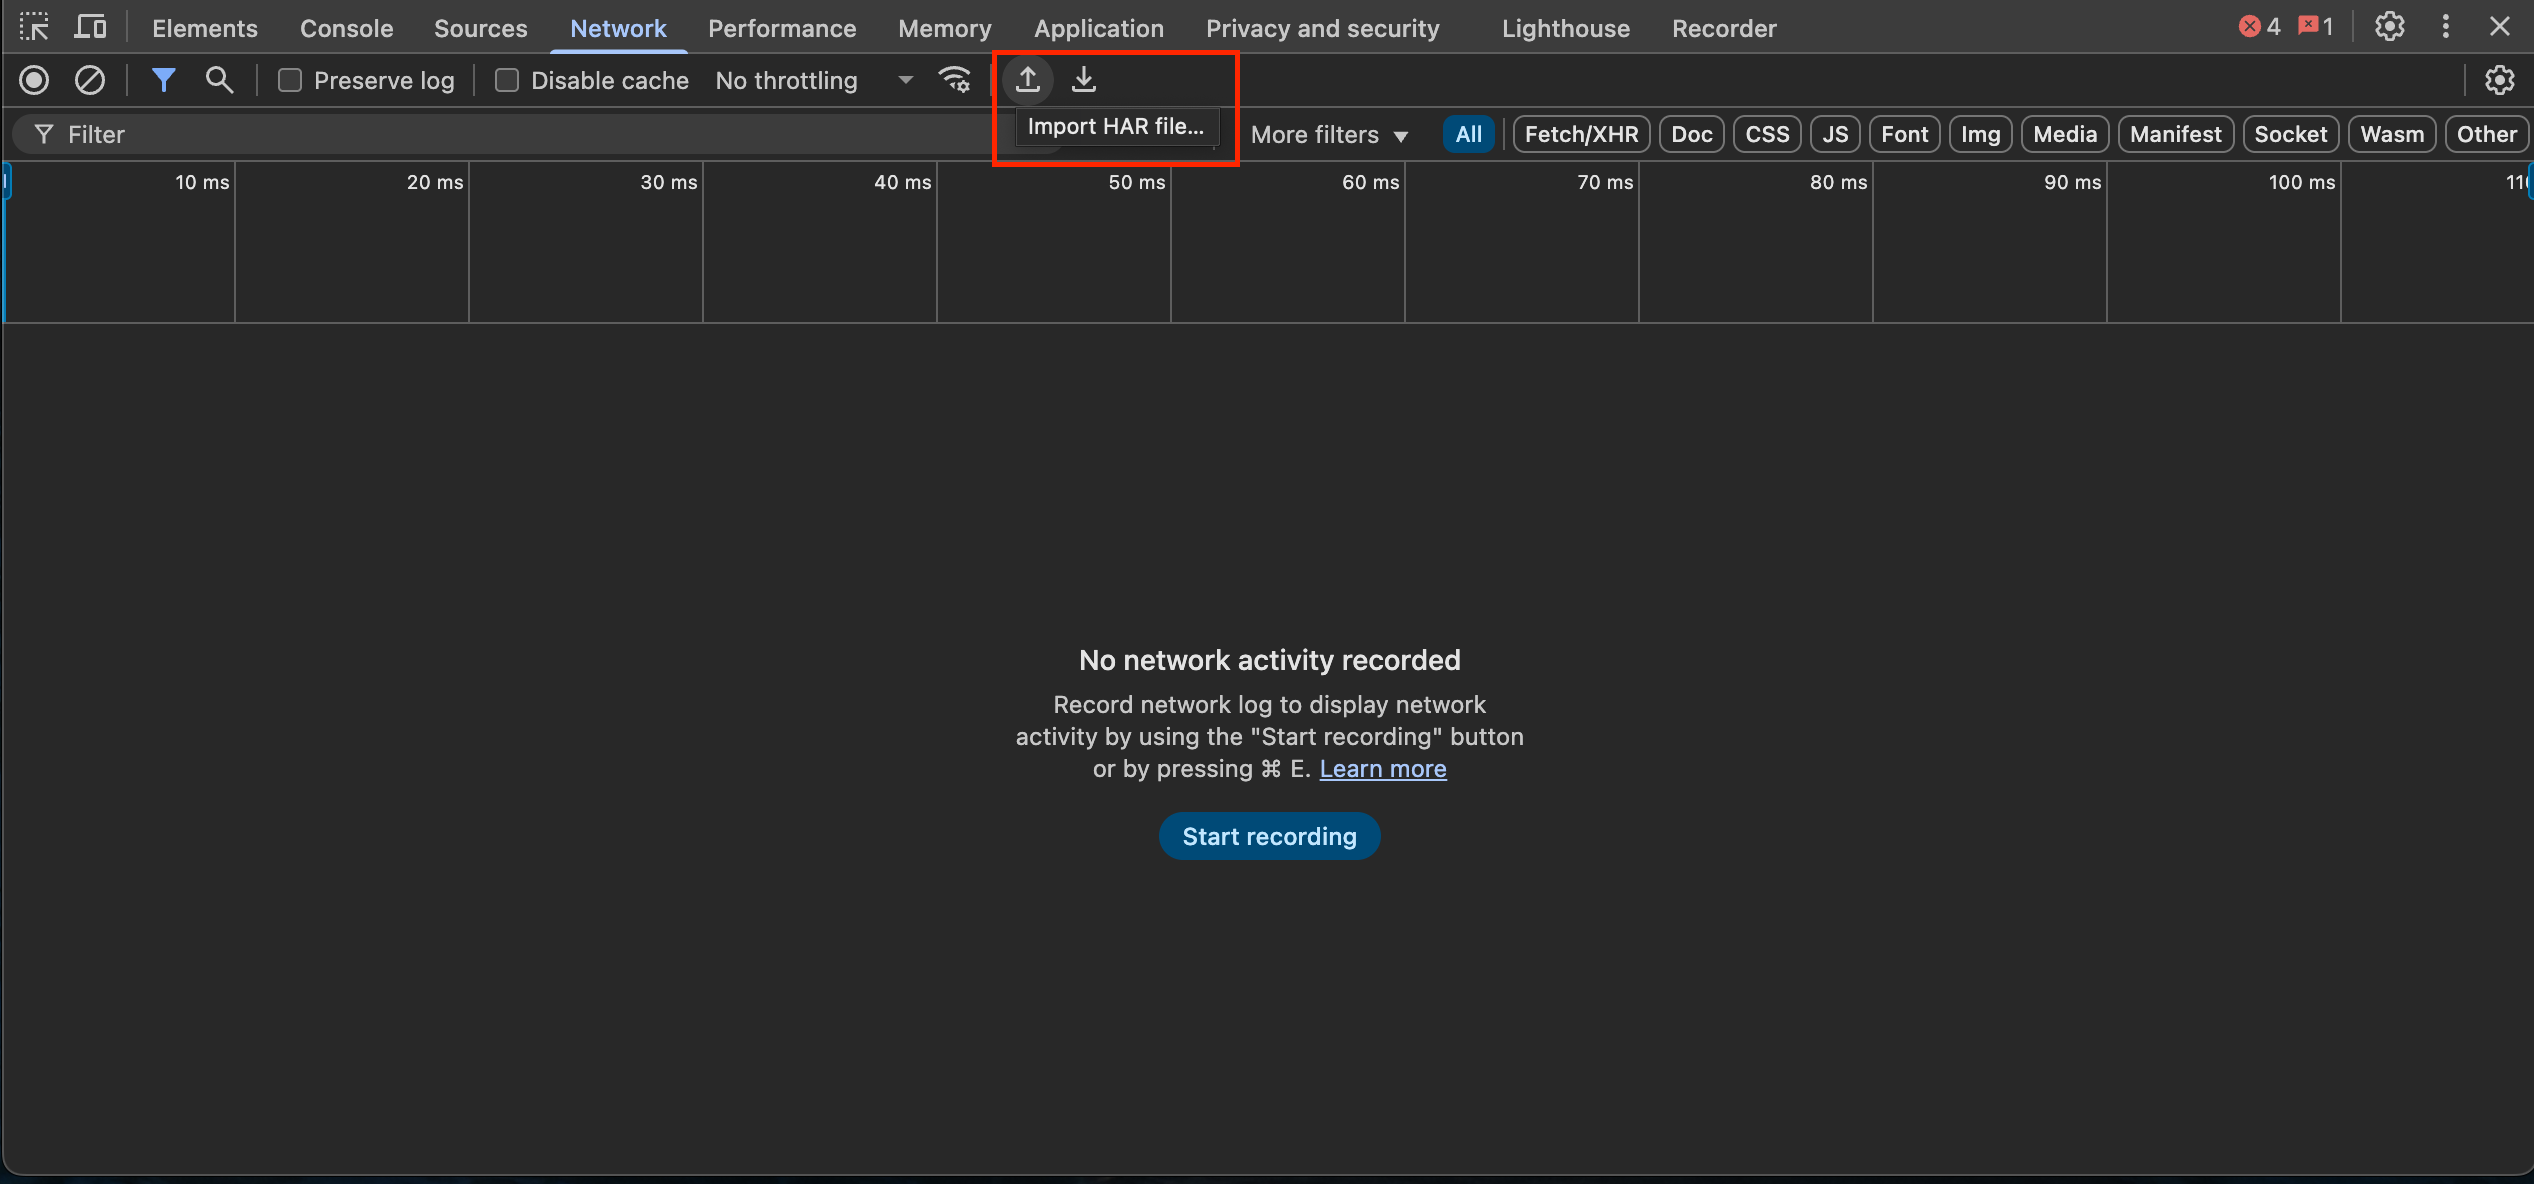
There are many alternative online tools available to view HAR files, but one of the easiest ways is to import them into the Chrome DevTools. Open the DevTools within Chrome, select the "Network" tab, and look for the "Import HAR" button
Special Platform Considerations
Android
This section describes how to package your Android application to allow network capture of requests made by the application. Due to limitations imposed by the Android platform on API level 24 or greater (Android 7.0), network capture requires additional changes to your application's manifest to allow the use of the TV Labs certificate (a user certificate). If your application is targeting API level 24 or greater, you will need to add a trust anchor to your application's manifest.
In your AndroidManifest, add a reference to a network_security_config XML file if it doesn't already exist:
<?xml version="1.0" encoding="utf-8"?>
<manifest ... >
  <application android:networkSecurityConfig="@xml/network_security_config" ... >
      ...
  </application>
</manifest>
If you added the network_security_config file reference in the previous step, create the file and add the following to allow the usage of user certificates in your test build:
<?xml version="1.0" encoding="utf-8"?>
<network-security-config>
  <base-config cleartextTrafficPermitted="true">
    <trust-anchors>
      <certificates src="system" />
      <certificates src="user" />
    </trust-anchors>
  </base-config>
</network-security-config>
See the Android Developer security configuration documentation for the latest details.
Android TV
Android TV platforms (including Google TV and Fire TV) disable install flows for CA certificates, so the TV Labs certificate must be embedded in the application package to use network capture with these devices. After setting up the Network Security Configuration outlined in the Android section above, follow the instructions below to build your application with the TV Labs certificate.
Downloading the Certificate
TV Labs provides an API endpoint to download the certificate bundle containing the TV Labs certificate. This example stores the certificate under certs/tvlabs-ca-bundle.pem in the application file tree.
curl -H "Authorization: Bearer $TVLABS_API_KEY" -o certs/tvlabs-ca-bundle.pem https://tvlabs.ai/api/v1/certificate/android_tv
This certificate is downloaded in the PEM format, but Android applications expect DER format. You can use the following command to convert the certificate file to DER format.
openssl x509 -in certs/tvlabs-ca-bundle.pem -out certs/tvlabs.cer -outform DER
Place the DER format certificate output at certs/tvlabs.cer in the application app/src/main/res/raw directory, and update your Network Security Configuration to include the new certificate.
<?xml version="1.0" encoding="utf-8"?>
<network-security-config>
  <base-config cleartextTrafficPermitted="true">
    <trust-anchors>
      <certificates src="system" />
      <certificates src="@raw/tvlabs" />
    </trust-anchors>
  </base-config>
</network-security-config>
Rebuild your application as normal, and your application package is now ready to be used with network interception on Android TV devices!
VegaOS
VegaOS is Amazon's Linux-based Fire TV operating system, distinct from the Android-based Fire OS covered in the Android TV section. Applications are packaged as .vpkg files rather than APKs.
Like Android TV, VegaOS does not expose an end-user flow for installing a CA certificate, so HTTPS interception requires the application under test to trust the TV Labs CA. Unlike the other platforms, no application changes are needed to make that happen: when TV Labs sideloads your .vpkg, it repackages it with a proxy configuration and the TV Labs CA, then re-signs it. The application reads that configuration at startup and routes its HTTPS traffic through the proxy, so requests are captured without any URL prefixing on your side.
Two consequences follow from doing this at sideload time:
- Capture always uses Direct Proxy mode on VegaOS. The
direct_proxyoption (and thetvlabs:network_capture_direct_proxycapability) is implied; whatever value you pass is ignored. Transparent proxying is never used, because a VegaOS application will not trust a CA that was injected into the network path. - Capture must be requested when the session starts, by setting the
tvlabs:log_networkcapability. The repackaging happens as the build is installed, which is before a mid-sessionstartNetworkCapturecall could run. Withouttvlabs:log_network, your original package is installed untouched and later captures will not see its HTTPS traffic.
If your application already bundles the TV Labs CA and a matching proxy configuration, TV Labs detects this and installs your package as-is rather than repackaging it.
Roku
This section describes how to package your Roku BrightScript application with the TV Labs certificate. Due to limitations imposed by the Roku platform installing client certificates on the device is impossible, meaning to use network capture the TV Labs certificate must be embedded in the application package along with application logic when making network requests.
Downloading the Certificate
TV Labs provides an API endpoint to download the certificate bundle containing the TV Labs certificate. This example stores the certificate under certs/tvlabs-ca-bundle.pem in the application file tree.
mkdir -p certs
curl -H "Authorization: Bearer $TVLABS_API_KEY" -o certs/tvlabs-ca-bundle.pem https://tvlabs.ai/api/v1/certificate/roku
Using the Certificate in Application Code
The ifHttpAgent interface provides a SetCertificatesFile method that can be used to set the certificate file used for HTTP requests made by the implementing object. Most Roku objects, including roSGNode, roVideoPlayer and roUrlTransfer objects implement this interface, see the Roku documentation for more details. If you are using a third-party library, please refer to the library's documentation for the correct way to set the certificate file.
Set the certificate file to the system default. This will be replaced with the TV Labs certificate in the next section:
req = CreateObject("roUrlTransfer")
req.SetCertificatesFile("common:/certs/ca-bundle.crt")
req.InitClientCertificates()
' ... make the request w/ certificate ...
If the server in your request does not use mTLS, the InitClientCertificates() function call will cause the request to timeout because the server will never request the client certificate. In this case, skip the InitClientCertificates() function call to avoid the timeout.
Swapping the Certificate
The Perl script below can be used to replace all instances of the certificate path values in the application code.
# Find and replace all instances of the certificate path in `.brs` files in the current directory tree
find . -name "*.brs" -type f -exec perl -pi -e 's|common:/certs/ca-bundle.crt|pkg:/certs/tvlabs-ca-bundle.pem|g' {} +
After running the replacement script, the application code will look like this:
req.SetCertificatesFile("pkg:/certs/tvlabs-ca-bundle.pem")
Package the application using your normal process, ensuring the TV Labs certificate is included in the certs directory. Your application package is now ready to be used with network interception!